Archive

Posts Tagged ‘Event Handler’

Sample way of constructing email body in Syteline Event system

May 24th, 2014 No comments

Below are some sample ways of constructing email body in Syteline event system.

BODY( SUBSTITUTE(“We have a new customer. Please see customer number {0} for customer: {1}.”, FP(“custNum”), FP(“custName”) ) )

This uses the common SUBSTITUTE function and use object property as parameter value.

BODY( IF( P(“POCost”) > 10000, GC(StdApprovalMessageBody), GC(StdRejectionMessageBody) ) )

Notice the IF function and combine with Global Constant

BODY( FILECONTENTS(“X:\SL\Event\Message\Body\myPreparedMessage.txt”) )

This actually inserts a whole text file.  But static text file is not really useful.

BODY( FILECONTENTS(“X:\SL\Event\Message\Body\” + IDO() + EVENTNAME() “.txt”) )

This one provide a bit more flexibility, allow you to use differ text file for differ event.

BODY( DBFUNCTION( “MsgBodyFunction”, EVENTNAME(), IDO(), P(“RowPointer”) ) )

How to extract and/or copy Event metadata

November 18th, 2013 No comments

To extract the Event System metadata, please do the following:

  1. On the Syteline utility server, go to <install drive>:\program files\Infor\Syteline
  2. Double-click on AppMetadataTransport.exe
  3. On the first few forms of the wizard, enter the appropriate information (e.g., select to export the metadata to an XML file, pick the appropriate configuration, browse to enter an export file name)
  4. Next there will be several forms with different selection options starting with “IDOs to export”.  Skip these by clicking <Next> until you see the form for exporting Events.
  5. On the Events form, select the option “Export Event MetaData for this AccessAs value” and select (null) as the AccessAs value.  Note:  Most user-defined event handlers are setup with AccessAs = Null.  If this is not the case in your environment, then you would specify your AccessAs value when extracting.
  6. Then click through the rest until the last form.  Select <finish> on the last form.
  7. The metadata will be extracted to the xml file specified in the wizard.  If Infor Support requested the Event metadata, please send them that xml file.

If you need to copy the metadata to another environment, then you would use the same utility to import the metadata into another database, but instead select to import and reference the XML file you just created.  IMPORTANT NOTE:  This will overwrite all event handlers with the same AccessAs value in the target database.  Please see linked KB 953806 for related CER:  CER 135998 – Need utility to import/export single events that will also not overwrite existing events when importing.

Additional information on copying events from one environment to another:

1)  If you have just a few event handlers that need copying and want to preserve the events in the target environment, then there are a couple of options:

  • You can manually recreate the event handler records and then manually copy and paste the actions

or

  • You can export events from both the source and target environments into separate xml files.  Make a copy of the target xml and edit the copy.  Manually copy and paste the source event data into the target xml copy.  If the event handler’s event name is the same between the two files, then assign a unique sequence number to the one(s) you are adding to the xml.  Then import the target copy which now contains both the original events and the few that have been added.

2)  If you have a lot of events and want to copy all of them, you could edit the xml file from the source events and change the Access As value and then import that xml file.  The target Access As value would be the new one you assign.  Please note that you would need to not only change the Access As value at the top of the XML document, but also add a node: <AccessAs>value</AccessAs> to every Event, Event Global Constant, Event Trigger, Event Initial State, and Event Handler in the document.  Once you import it, if you have to make changes to any of the events you imported under the different Access As value, you will have to change the Access As value in the database, or you would need to reset the AccessAs value on the events in the appropriate Event related tables to their original value.

Set default ship via code based on customer type

March 23rd, 2010 1 comment

In Syteline, there are many ways to default field value.  The most simple way is to use the default value property of the field component.  But if you need to set the default value based on some other field value, that simple property value would not cut it.

Syteline Application Case

We want to default ship via code in Customer Ship To form based on customer type.

Syteline Technical Components

Event Handler, Inline Script, SQL Store Procedure.

Customization Solution

Since the customer type is in Customer form, but not in Ship To form, we need to get that in.

1) Create a simple SP: nGetCustType

ALTER PROCEDURE [dbo].[navGetCustType]
(@CustNum [CustNumType],
@CustType [CustTypeType] output)

as

select @CustType = cust_type
from customer
where cust_num = @CustNum and cust_seq = 0

2) Add a new event handler to event:StdObjectNewCompleted, to call the following Inline Script:

Option Explicit On
Option Strict On

Imports System
Imports Microsoft.VisualBasic
Imports Mongoose.IDO.Protocol
Imports Mongoose.Scripting

Namespace SyteLine.GlobalScripts
Public Class EvHandler_StdObjectNewCompleted_5
Inherits GlobalScript

Sub Main()

Dim nRetVal As InvokeResponseData
Dim nRequest As New InvokeRequestData()

nRequest.IDOName = “SP!”
nRequest.MethodName = “nGetCustType”

nRequest.Parameters.Add(ThisForm.PrimaryIDOCollection.GetCurrentObjectProperty(“CustNum”))
nRequest.Parameters.Add(“”)

nRetVal = IDOClient.Invoke(nRequest)

ThisForm.Variables(“vCustType”).Value = nRetVal.Parameters(1).ToString

if ThisForm.Variables(“vCustType”).Value = “AAA” or _
ThisForm.Variables(“vCustType”).Value = “BBB”  then
ThisForm.PrimaryIDOCollection.SetCurrentObjectPropertyPlusModifyRefresh _
(“ShipCode”, “UPRP”)
else
ThisForm.PrimaryIDOCollection.SetCurrentObjectPropertyPlusModifyRefresh _
(“ShipCode”, “UP7A”)
end if
ReturnValue = “0”
End Sub
End Class
End Namespace

Within this script, we call the SP, get the Customer Type, then based on the customer type to set the ShipCode value.
Assigning field value in a Syteline Form, based on another field value entered. (1)

February 17th, 2010 No comments

In Syteline form, quite often, you would need to assign some field value, base on another field value entered.

Business case:

Let say in Customer Order, for certain payment terms, you would not allow partial shipment.  So in the CO header form, when user select certain payment term, you want the system automatically uncheck the “Ship Partial” check box.

Syteline Technical Components:

Inline Script, Event Handler

Solution

In Syteline 7 & 8, there is quite a few differ ways to accomplish this.  The first one we are going to discuss here is to use Inline Script.

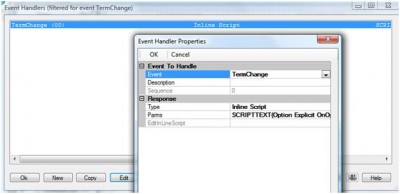
1)      In Customer Order Form, for form component: TermCodeEdit, add a data change event: TermChange.  And the event handler will call an Inline Script

2)      The Inline Script:

Option Explicit On

Option Strict On

Imports System

Imports Microsoft.VisualBasic

Imports Mongoose.IDO.Protocol

Imports Mongoose.Scripting

Namespace SyteLine.GlobalScripts

Public Class EvHandler_TermChange_0

Inherits GlobalScript

Sub Main()

if ThisForm.PrimaryIDOCollection.GetCurrentObjectProperty(“TermsCode”) = “128” then

ThisForm.PrimaryIDOCollection.SetCurrentObjectPropertyPlusModifyRefresh _

(“ShipPartial”, “0”)

end if

ReturnValue = “0”

End Sub

End Class

End Namespace

This script will assign the ShipPartial to 0, when user select TermsCode = 128.

Right Click Menu

October 12th, 2009 No comments

Each component in Syteline form can have its own right click menu, and this right

Syteline screen shoot

click menu is customizable.

See the sample, the “Ship To” field has a standard right click menu, with “Add”, “Detail”, “Find” and “Help” menu items.

If you look into the component property of “Ship To” field, you can see the “Right Click Menu” property is blank.   But this property is inheriting from the component class: CustSeq.  In there, the right click menu defined to be StdDetailsAddFind.

There are list of the pre-exist right click menu you can use, such as “StdAddFind”, “StdHelp” and such.

You can also modify or create a new right click menu by go into the “Shortcut Menu Properties” dialog box.

image

Over there, you just need to define the “Menu Item/Caption” and the “Event to Generate” for each of this menu item.

image