Archive

Archive for October, 2011

How to back out an AR payment applied incorrectly

October 24th, 2011 No comments

Let say you have an AR payment applied to an incorrect invoice. And you need to remove the payment from incorrect invoice and apply it to a different invoice.

If you do not need to change the check number, then you can update the applied to invoice number in the AR Posted transaction Detail form. Pull up the record for the payment and change the apply to invoice number from the incorrect invoice number to the correct invoice number. 

If your check numbers are tied to the invoice numbers and you need to create a new payment to apply to the correct invoice, you will need to adjust the AR payment.
1) Open the AR payment form and add a new record for your customer.
2) Type will be adjustment and you will  need to enter your original check number in the number field. Save.
3) Enter the amount as a negative number and save
4) Click on the distributions and type in the invoice number that the payment was originally applied to.  Enter the amount as a negative amount. Verify that the amount remaining is 0
5) In the AR Adjustment Posting, post the payment adjustment.
6) In AR payments, create the new check and apply to the appropriate invoice
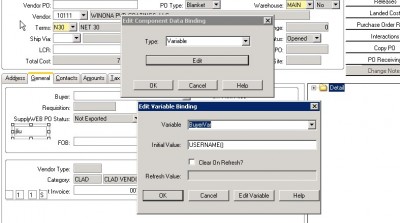
Obtaining Username in form script

October 24th, 2011 5 comments

In syteline 7 it was SessionManager.BaseUserName.
In Syteline 8

  • Create form component ‘UserEdit’ and bind it to variable ‘User’ with initial value ‘USERNAME()’
  • Get the value on form script by ‘ThisForm.Variables(“User”).Value’
    This will return the UserID who login to Syteline.
  • Use System.Environment.UserName to get the UserID login to Windows.

Here is a sample screen shot

ScreenHunter_04 Mar. 21 10.29

How to clear small outstanding balances in AR

October 24th, 2011 No comments

With various reason, such as foreign currency conversion, you may see small outstanding balance resident in AR for some customer account, and the customer truly didn’t owe that money.

One option is to write off small outstanding balances (either positive or negative) to either Discounts Allowed or Allowances.   To do this, you will need to create a zero dollar payment.   The steps are as follows:
1.  A/R Payments
New
Enter the Customer Number
Type = Check
Number = (new check number)
Save
2.  Click Distributions
Enter the invoice number with outstanding balance
The amount left open on the invoice will default in Dist Amount field on Amounts tab
Transfer this value (either positive or negative) into either the Disc field or Allowance field
Then set the Dist Amount = 0.00
Post the payment
Another option is to enter credit or debit memos to offset any remaining balances

Void an AP Posted Payment

October 16th, 2011 1 comment

In Syteline 8, there is an utility program called Void AP Posted Payments Utility, which you can use to void an AP posted payment.  But if any of the following conditions exist, you can’t use this utility. 

1) Multi-site environment

2) You compress Journal transactions

3) You are trying to void a manual type check

4) The same check number has been used in multiple bank codes

You will need to void using a manual negative check when any of these conditions exist.

The steps to enter a negative manual check in SL7 and SL8 are as follows:

1. Open Bank Reconciliations Form
Filter for Bank Code
In lower grid, filter for type Manual
Identify a manual check number that has NOT been used

Note:  If  you are trying to void a standard check, you can use the check number on the standard check

2. Open A/P Payments Form
New
Enter Vendor Number
Payment Type = Manual
Check Number = Available Manual Check Number
Bank Code = Bank Code on original check
Payment = Enter negative check amount
Save

3. Distributions
Type = Voucher
Vch/Seq = Voucher Number that was paid on original check
Accounts Tab:
Amount Paid = Enter negative payment amount
Disc Taken = Enter negative amount if discount was taken on the original check
Save

NOTE: If more than one voucher was paid on the original check, follow step 3 for each voucher paid

4. Activities – A/P Check Printing/Posting
Verify Bank Code is correct
Click Final Register And Post
Process

Easy way to link a show only field to Form

October 15th, 2011 No comments

Let say you want to show item material status in Item Availability Form, you may just create a new edit field in form, then bind the form component to

COLLECTION(SL.SLItems(PROPERTY(Stat) FILTER(Item = FP(Item)))) .

Please note that if you want to do this in grid column, since the value is not in collection, so the grid column would be blank initially.  Only when you click on a row, the column value would show.  

What is the process for returning customer orders through the Order Shipping form in Syteline?

October 15th, 2011 No comments

If your user has processed a customer order shipment incorrectly and needs to do Credit Return or needs to change the invoice date on an invoice generated from Order Entry then follow the steps below…

IF THE ORDER HAS BEEN INVOICED:

  1. Ensure that the invoice has been posted through the Invoice Posting form first.  Then go to the Order Shipping form and set the CO Line/Release to Filled and filter on the customer order in question.

  2. The line(s) for the customer order you filtered on should appear at which point you will need to select the lines in question and ensure you tick the CR RTN box.  Put in the qty to be returned (as a positive amt) and a return reason code. If you need to reverse your Freight and/or Misc Charges then go to Actions – Edit Freight Charges and type in a positive dollar amount for what you want to give as a credit to this customer (an alternative is to go to the Customer Orders form under the Amounts tab and type in the positive dollar amount in both the Freight and/or Misc Charges fields that you want to credit to this customer prior to step 1).  Lastly on the Customer Credit Return tab select the invoice for which the Credit Memo should be matched to once generated.

  3. You will then need to ship the line(s).

  4. Once the lines have been shipped if you go to Order Invoicing/Credit Memo and print the credit memo (ensure that you set Invoice or Credit Memo field to Credit memo).

  5. Once the credit memo has been generated and printed go onto the Invoice Posting form and post the credit memo.

  6. The last step (only if you have forgotten to select the invoice for which the Credit Memo should be matched to on the Order Shipping form) is to match the Credit Memo to the Invoice which was generated incorrectly and this is done by going on the A/R Posted Transaction form and filtering on the customer and then selecting the Credit Memo which was generated by selected the Detail button.  You will then need to set the Apply to Invoice field to the Invoice which was incorrectly generated, doing this will ensure that the Invoice is not outstanding on the customers account.

  7. At this point you may want to make changes to the line before it is reshipped and you can do that in Order Line Maintenance.

  8. Go to the Order Shipping form and and filter on the customer order in question and the line(s) should appear with the quantity on it.  You can update any information on the line here if required.

  9. Select the line(s) in question ship them as normal.

  10. Once the lines have been shipped if you go to Order Invoicing/Credit Memo and print the invoice.

  11. . Once the invoice has been generated and printed go onto the Invoice Posting form and post the invoice as normal.

IF THE ORDER HAS BEEN INVOICED AND WAS SHIPPED THROUGH A DELIVERY ORDER
An RMA return and credit must be performed. Return cannot be processed on the Order Shipping screen for these.

IF THE ORDER HAS NOT BEEN INVOICED:

  1. Go to the Order Shipping form and set the CO Line/Release to Filled and filter on the customer order in question.

  2. The line(s) for the customer order you filtered on should appear at which point you will need to select the lines in question and enter in a negative quantity and a return reason code.

  3. You will then need to ship the line(s).

AUTONUMBER

October 15th, 2011 No comments

In Syteline form grid, if you have line# and you want it to be auto populated, you may use the AUTONUMBER function, just set the component default value property to AUTONUMBER.

Syntax

AUTONUMBER( [ STEP( ) ] [ FILTER( ) ] )

Remarks

During processing of the New standard operation, AUTONUMBER sets the value of the component to the highest value of a property, determined from both the collection and the application database, plus the increment specified by the argument of STEP.

If STEP( ) is omitted, AUTONUMBER uses a default increment of 1, setting the value of the component to one greater than the highest value in the collection and in the application database.

If FILTER is omitted, WinStudio attempts to construct filter criteria to retrieve the current maximum value from the application database.

Example

AUTONUMBER(STEP(1) FILTER(OrderNo=FP(OrderNo)))

Consolidate Payment Record in Bank Reconciliation

October 15th, 2011 No comments

When doing an AR payment posting, if there are multiple payments from same customer or differ customers, the cash account entry will be consolidated into single one.  So in Bank Reconciliation, there will be single total line cash record, instead of check by check.

For example,

1. Create Payment
Customer 1 : Cheque Amount = USD 200 ; Date :1 December 2010; Bank : BK1
Customer 2: Cheque Amount = USD 300 ; Date : 2 December 2010; Bank : BK1
2. A/R Payment Posting
3. GL –> Journal Posting
4. Bank Reconciliation
Transaction appear as 1 line ; Amount USD500 ; Date : 1 Dec 2010

If you do not want an A/R payment (Adjust, Check, Wire) or a returned check (check entered as a negative amount) included in a summarized Bank Reconciliation record, you will have to do separate AR payment postings.

When you have a single check posted, the customer number, check number, and customer name will be seen in the Bank Reconciliation form.

When you have more than one check posted, for different customers, a "summary" deposit is created. Since there is more than one customer here, the customer number, customer name, and check cannot be specified in the one line bank reconciliation "Deposit".  If you want to see specifics for each check, then you have to post them separately, one at a time.

The detailed payment information which is used to calculate one of these summarized bank reconciliation records can be obtained by looking at the A/R Distribution Journal.

No List Cache

October 15th, 2011 No comments

Sometime, in an In Collection Validator, you would get a “Cache Property not in Cache” error. 

Make sure to check the “No List Cache” check box.  This will force to refresh IDO collection in Cache.

image

Process a returned customer check

October 15th, 2011 1 comment

Parameters can be setup on the Accounts Receivable Parameters form. A Returned Check Fee amount can be entered there. They can also designate to create Debit Memo for the customer for the returned check amount, plus returned check fee amount.
In order to create a Debit Memo to send to the customer when a check is returned, follow these steps:

1) Go into Bank Reconciliations
Filter for bank code
Put cursor in bottom to add a bank rec
Add bank rec type "Deposit"
Transaction Number = this is the bank rec trans #, similar to manual check number. They can start with 100 and let system increment after that
Ref Type = A/R
Ref Num = Customer Number
Customer Check Number = check number returned
Amount = Amount of check
Bank Amount = Amount of check
Generate Returned Check Fee = Yes
Save the record

2) Open the Returned Checks form
Enter the bank code
Process Returned Checks = Yes
Preview – Process
They should see the record in the grid
Commit – Process
Debit Memo should have been created
If the check is re-deposited, the user can select the Process Returned Check Deposit option on the Returned Check form, and the system will create a credit memo to offset the debit memo.