Archive

Archive for the ‘Application’ Category

Things to consider when moving from job orders to production schedules

March 21st, 2016 No comments

If you are using the Syteline job order system for tracking and reporting production and are thinking of changing to use production schedules, here are some things to consider:

1) An item must be standard costed before you can enter it on a production schedule.  If you are currently using actual costing, this would be a major change and there is a lot to be considered…accuracy of your routings/BOMs, creating and setting up all of the variance accounts, etc.

2) When using production schedules, to get material, labor, labor overhead and machine overhead issued or posted, you either have to backflush it all or enter work center material, work center labor and work center machine transactions for all of it.  Most users opt for backflushing.  If you choose backflushing, you have to set up all of the current materials and operations to backflush (if they aren’t already) for each parent item that you will be processing with production schedules.

3) You report production with production schedule complete transactions.  You  would need to determine if you want to enter a PS complete transaction to report production at each step in the routing, selected steps, or only the last step and then set the operation control points accordingly.   For example, if you want to report at each operation, you would want to make them all control points.  If you only want to enter a transaction against the last operation, it would need to be a control and all of the others must not be so the entire routing/BOM is backflushed.

4) If you are currently using standard costing on jobs, you would need to be aware that the timing of variances are different with production schedules.  With jobs, labor rate, labor usage and overhead usage variances are recorded as transactions are posted and material usage variances are booked when jobs are closed.  With production schedules, no variances are recognized as transactions are posted. Differences between “actual” costs (what is posted into WC WIP based on the PS routing/BOM) and “earned” costs (what is removed from WC WIP based on the standard routing/BOM) remains in the WC WIP buckets until you run the EOP Costing utility.  At that time, all variances are posted and the WC WIP buckets are cleared.

5) A major difference from jobs is that reporting for jobs is job or item centric.  With production schedules, cost reporting is all work center centric.  i.e. they show the labor, material, overhead, etc. posted against work centers.

6) You should absolutely setup some test production schedules in a demo or test database, process them, review the accounting entries, check out the available reports, run EOP Costing, etc. to make sure you are very clear on the functionality before switching from jobs
Categories: Application Tags:

Applying patch on a modified form.

February 19th, 2015 1 comment


  1. Read the cover letter, highlights forms that have been modified, and Sps that have EXTGEN on.

  2. For EXTGEN SPs, will need to manually apply the new changes.

  3. For modified Forms, make a backup of the Form scripts use FormSync.

  4. Apply the patch to unused configuration, such as Demo.

  5. Merge the new vendor version of form from Demo to target configuration, form by form.

    1. Start FormSync with

    2. Filter with single form.

    3. Do not apply change to any other objects.

    4. Keep other object unchanged.

Remember to uncheck all the filters here.

  1. Run Synchronization

  1. Test the newly merged, modified form.  May need to work out conflict if there is any.

Categories: Application Tags: , ,

Some notes on Job Planned Cost

February 19th, 2015 No comments

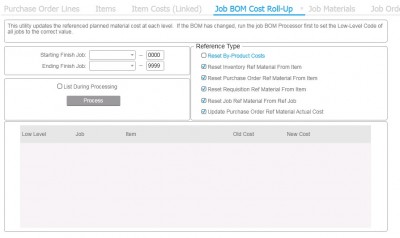
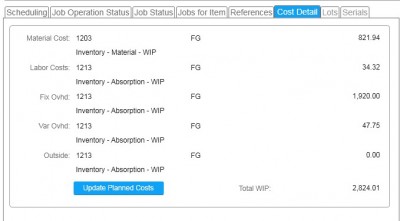
1) The “Job BOM Cost Roll Up” utility and the “Update Planned Cost” button in Job form, Cost Detail tab are pretty much doing the same thing, they will update the material cost in job material.

ScreenHunter_04 Feb. 19 09.33


ScreenHunter_05 Feb. 19 09.38


2) Syteline system didn’t maintain a field for total job planned cost, you have to run job costing reports like “Job Cost Various Report” to see the total planned cost.

3) Job BOM Cost Roll Up use the item Unit Cost, and Current BOM Cost Roll Up use item Current Unit Cost.  So even you just copy the Job BOM from Current BOM, the current cost of job item may be differ than the job planned cost.

4) Cost roll up utilities rely on Unit Cost and Current Unit Cost maintained in Item Cost.  For a new item, say it is a purchase item, Syteline system would not assign Unit Cost and Current Unit Cost, until you conduct the first inventory transaction for the item (the transaction can be a PO receive, a Job complete receive or Misc receipt).   So your job material plan cost would not include these new materials.  Even you create a PO for the new item, system would not save the PO cost back into item cost, until you actually receive that PO.   However, for a new item, with or without a PO, you can use Item Cost form, Cost Maint tab to assign initial Unit Cost and Current Unit Cost.

Inline image 2

You will see that the Unit Cost fields are open for edit for this new item.  Once you conduct a receiving transaction and has qty on hand, the Unit Cost fields are No Longer editable.  It will be maintained by the system.
Note 1: these initial unit costs and current unit costs will have no effect on your inventory as you have qty-on-hand of 0.  These purely just for your job plan cost.
So for a new purchase item, it is suggested that you a) setup vendor contract price, b) setup initial unit cost and current unit cost in item cost maintenance, c) do cost roll up.
5) There is checkbox in PO line form, called “Update Job Material Unit Cost”, this only works for cross-referenced job material.  It will update the job material cost, when the PO cost change.

Setup and process 1099 in Syteline

February 17th, 2015 No comments

1) Setup Tax Parameter, enter your own company’s Tax ID.

clip_image002[7]

2) In your Tax System setup, make sure the Tax ID Prompt Location set to included Vendor (Vendor or Both).

clip_image004[5]

3) In Accounts Payable Parameters, under 1099 tab, enter your company information. These are info will be print on your 1099 form.

clip_image006[5]

4) Now, for each vendor that you need to send 1099, enter their Tax ID.

clip_image008[5]

5) Part of your year end procedure, you should run the “Rebalance Vendor Payment History” utility.

clip_image010[5]

This will update the Payment History tab on your Vendors form.

clip_image012[5]

6) Now you are ready to print the 1099 form.

clip_image014[5]

Categories: Application, Implementation Tags: , ,

Fixing YTD number in Item warehouse.

February 3rd, 2015 No comments

Part of the Syteline year end procedure is to run an utility to reset the YTD number in item warehouse form.  This needs to be done in timely manner.  If you forget to run it during your year-end, there is no rebalance utility to recalculate that these YTD number in Syteline.

The below small script is to help re-calculate and update that YTD numbers.

——- Checking ———-
select top 100
iw.item,
iw.whse,
(select SUM(qty) from matltran where item = iw.item and whse = iw.whse and trans_date > ‘1/1/2015’ and
((trans_type = ‘R’ and ref_type <> ‘K’ and ref_type <> ‘S’) — PO receiptor
or
(trans_type = ‘W’ and ref_type = ‘P’) — PO return.
) ) ‘YTD Purchase’,
(select SUM(qty) from matltran where item = iw.item and whse = iw.whse and trans_date > ‘1/1/2015’ and
((trans_type = ‘S’) — CO Shipment
or
(trans_type = ‘W’ and ref_type = ‘O’) — CO return.
) ) ‘YTD Sold’
from itemwhse iw
where item = ‘512653’

———– Actual Update ————-
update itemwhse
set qty_pur_ytd = (select SUM(qty) from matltran where item = itemwhse.item and whse = itemwhse.whse and trans_date > ‘1/1/2015’ and
((trans_type = ‘R’ and ref_type <> ‘K’ and ref_type <> ‘S’) — PO receiptor
or
(trans_type = ‘W’ and ref_type = ‘P’) — PO return.
) ),
qty_sold_ytd = (select SUM(qty) from matltran where item = itemwhse.item and whse = itemwhse.whse and trans_date > ‘1/1/2015’ and
((trans_type = ‘S’) — CO Shipment
or
(trans_type = ‘W’ and ref_type = ‘O’) — CO return.
) )

Some suggested routine after a Syteline Upgrade

July 6th, 2014 No comments

They are not stated in Syteline manual, but from my experience, I would suggest the following routine after upgrade a Syteline DB.

1) Regenerate _all table, by using “Update _All Tables” form.

2) Regenerate trigger, by using “Trigger management” form.

3) Regenerate Replication Triggers, if you are using multi-site replication.

4) Drop all the _tt and _tmp tables.  These would force system to rebuild those temp tables.  Please refer to Information on the different temporary tables in a SyteLine database for a script to drop all those temp table.

Information on the different temporary tables in a SyteLine database

July 6th, 2014 No comments

In the SyteLine database you will find Temporary tables that start with:

  1. tt_*
  2. tmp_*
  3. tmp_snapshot_*
  4. tmp_staging_*

There are others that end with:

  1. _ii
  2. _dd
  3. _all.

The first six are various forms of permanent "temporary" tables, used for temporary processing of data.

The *_all tables are used to remove the requirement that another site must be connected in order to query its data. They contain a subset of columns from the other sites.

More detail:

  • tt_ and tmp_ tables are shared temporary tables that allow for less blocking on the actual data tables while processing a limited number of records. Since the actual data table is queried when users are viewing a form, it is advantageous to move processing of smaller amounts of records to a temporary table thereby avoiding contention in the database. There is no real difference between those that start with tt_ and those that start with tmp_. tmp_ is the new standard prefix for tables where data is temporarily stored to support some process. The prefix tt_ was used for that functionality converted from SL6 where tt-* was used.

  • tmp_snapshot and tmp_staging are generally used by Print/Post forms. tmp_snapshot_ is a static copy of the data so that printing uses the same data as posting (avoiding problems where someone changes the data between the two steps). tmp_staging is basically a RowPointer to the original record, plus some flags to indicate what steps of print/post have been completed.

  • _ii & _dd tables were created to avoid SQL performance problems specific to trigger actions. They are used exclusively by triggers to pass data from the trigger to procedures that they call. Simplifying the trigger decreases the likelihood that SQL will need to recompile the trigger.

  • Another important table of note is dynamic_table. This table dictates how permanent "temporary" tables are built. Since some of these tables are snapshots of other tables, database schema maintenance is less error prone when a change to the real table is automatically applied to the permanent "temporary" table. This also allows for more fluid introduction of UET’s into standard SyteLine processing.

  • The life span of the data in all of these tables is intended to be short. Once all steps are complete in any given application, the records (which are segregated by by ProcessId) should programmatically be deleted. If records persist, then it is a sign of abnormal application shutdown, or a bug in the code which fails to execute the cleanup. If you know that no one is in a given application, for instance if you have shut down SQL services, you can delete the records in the table, but note that this should not be a routine action as these tables should be self-purging and may have entries in them relating to scheduled tasks that have not yet been activated.

  • If the table is listed in dynamic_table, then if needed, the table can be deleted and the system will recreate it when necessary.

The following script will delete all temporary tables that are dynamic and will be recreated by the system when needed.
DO NOT MODIFY SCRIPT – – – -ALWAYS MAKE BACKUP OF DATABASE BEFORE RUNNING SCRIPT

declare @command1 nvarchar(2000)
declare @command2 nvarchar(2000)
declare @whereand nvarchar(2000)

set @command1 = ‘Drop table ?’
set @command2 = ‘Print "Dropped table ?"’
set @whereand = ‘and
(o.name like "tmp_ap%"
or o.name like "tmp_snapshot_ap%"
or o.name like "tmp_staging_ap%"
or o.name in (SELECT name from dynamic_table))
and o.name not in ("tmp_aps_sync","tmp_ap_quick_payments")’

exec sp_MSforeachtable
@command1 = @command1,
@command2 = @command2,
@whereand = @whereand

set @command1 = ‘Truncate table ?’
set @command2 = ‘Print "Truncated table ?"’
set @whereand = ‘and o.name in ("tmp_ap_quick_payments")’

exec sp_MSforeachtable
@command1 = @command1,
@command2 = @command2,
@whereand = @whereand

Categories: Application, Development Tags: , ,

Delete voided check and reset the next check number in AP

April 27th, 2014 No comments

Sometimes a user will accidentally type in a wrong number in the starting check number in A/P check printing and posting. If that check number is higher than the last check number used, the system will prompt to void all the check numbers in between. If that prompt is answered "ok", this will result in a large number of voided checks in the Bank Reconciliation and the system will not allow those numbers to be used.

This problem can be fixed in one of two ways.

The first is to go into the bank reconciliation and delete those voided checks one by one until they get back to the correct starting check number.

The second way is to use SQL Query to programmatically delete those voided checks.


/* This script is used to delete a range of check numbers from the glbank table */

declare @commit int, @rows int, @check_num GlCheckNumType

——————————————————————-

/* INSTRUCTIONS: CHANGE THE @commit VARIABLE TO VIEW OR COMMIT CHANGES

AND ENTER A MAX CHECK NUMBER. */

SET @commit = 0 — 0=View; 1=Commit the update changes

SET @check_num = 1055 — Enter highest check number wanted in SL

——————————————————————-

— VIEW CHECK RECORDS THAT WILL BE DELETED

select * from glbank

where check_num > @check_num and type = ‘C’

set @rows=@@rowcount

if @commit=0

begin

if @rows > 0 select [Results]=’Viewing record(s) to be deleted.’

else select [Results]=’No matching records found.’

end

else

begin

— DELETE CHECK RECORDS

delete from glbank

where check_num > @check_num and type = ‘C’

select [Results]= dbo.cstr(@@rowcount) + ‘ Glbank record(s) deleted.’

end


Progress version

for each (database name).glbank where check-num > xxxxxxxxx and type = "C":

display glbank with 2 col.

Run the query. If the checks that display are the ones that need to be deleted, then run the following:

for each (database name).glbank where check-num > xxxxxxxx and type = "C":

delete glbank.

This will reset the starting check number back to the original check.

Basic set up need to process cross site payments

April 26th, 2014 No comments

Syteline multi-site supports centralized AR payment process.  Here are the basic set-up steps

1.  Site Groups

Create a site group that contains all sites that will be sharing cross-site A/R Payments

NOTE:  All sites within the group must have the same domestic currency

2.  Replication Rules

Set up Replication Rule for category A/R for each site within the Site Group

Interval Type = Transactional

3.  Inter-Site Parameters

Add record for all From Site/To Site combinations

Populate Inter-Site Accounts on Payment Tab

4.  Accounts Receivable Parameters

Populate the Site Group field

Once the Basic Set-Up has been performed, you should be able to see invoices from all sites within the Site Group in the A/R Quick Payment Application grid.   However, Open Credits from remote sites will not appear in the A/R Quick Payment grid.   Those credits should be applied to invoices in remote site prior to entering payment in Payment site.

Example of journal entries for cross-site payment posting:

Three sites exist for Entity XYZ. Site A is designated as the centralized collection site where all customer payments are collected. If Site A receives a $300 payment from a customer to pay 3 invoices, each from a different site, the following journal entries must occur.

  1. Invoice customer – $100 from each entity.
Site A transactions: Debit Credit
A/R $100
Sales $100
Site B transactions: Debit Credit
A/R $100
Sales $100
Site C transactions: Debit Credit
A/R $100
Sales $100
  1. Post payment of $300 – distribute $100 to each entity.
Site A transactions: Debit Credit
Cash $300
A/R $100
Inter-Site Liab (Entity B) $100
InterEntity Liab (Entity C) $100
Site B transactions: Debit Credit
InterEntity Asset $100
A/R $100
Site C transactions: Debit Credit
InterEntity Asset $100
A/R $100

NOTE: To reverse the inter-site transactions; each site will create a manual entry when corporate pays cash to the sites.

Creating a Rework Order

April 9th, 2014 No comments

To repair an item that you have received through a return material authorization (RMA), you create a rework job order (or estimate job order). The rework order’s bill of material includes the item as the end item and as a component. This recursive BOM structure is allowed only on a bill of material for a rework order.

After receiving a returned, defective item (through an RMA return transaction), follow these steps to create a rework order and repair the item:

  1. Open the Job Orders (or Estimate Job Orders) form and create a new order. We recommend you decide on a special prefix to use in the job numbers for rework orders. Using a special prefix will allow you to filter your job reports to include only rework orders, if necessary.

  2. In the Item field, select the returned item that you want to repair.

  3. Select the Rework field. Selecting this field will allow this job’s bill of material to be recursive.

  4. Enter or select the appropriate values for the job in the remaining fields as desired.

  5. Enter the job operations (click the Operations button to open the Job Operations form).

  6. Define the job bill of material (click the Materials button to open the Job Materials form). Enter the item to be repaired as a component, along with any other materials necessary for the repair.

  7. On the Job Material Transactions form, issue the item to be repaired (from its non-nettable location where you originally received the RMA order) to the rework order.

  8. Issue any other needed materials to the rework order.

  9. Enter job operation transactions to record setup, labor or machine time, and overhead, and to move the completed, reworked item to inventory.

NOTES:

  • Only job orders and estimate job orders can be rework orders. You can also create a rework job order on the Engineering Workbench form (if you copy an estimate job to a job and the estimate job is a rework order).

  • When defining the bill of material for the rework order, the rework item can be recursive only two levels down in the BOM. For example, if end-item A is made from material B, A and B can be the same item. However, if A is made from B and B is made from C, C cannot be the same item as A.

  • Once you add a recursive BOM to the rework order, you cannot clear the Rework field on that job or estimate job (that is, you cannot change the rework order back into a normal job or estimate job).

  • When issuing the returned material to the rework order, you must enter the job material transaction on the Job Material Transactions form. You cannot use backflushing and you cannot use the Post Material Issues option on the Job Pick List report.

  • For MRP and APS planning, the end item of the rework order is considered as a planned supply/receipt. The same (recursive) item in the bill of material is not considered as a demand/requirement. If the rework order has no routing/BOM, MRP and APS ignore the rework order completely.

  • If you use Standard costing for a rework item, you may encounter large routing and/or material usage variances, because the routing and materials used to repair the item may vary greatly from those used to build the original item.